High-Availability Kubernetes Cluster Setup on-prem (CentOS 7)
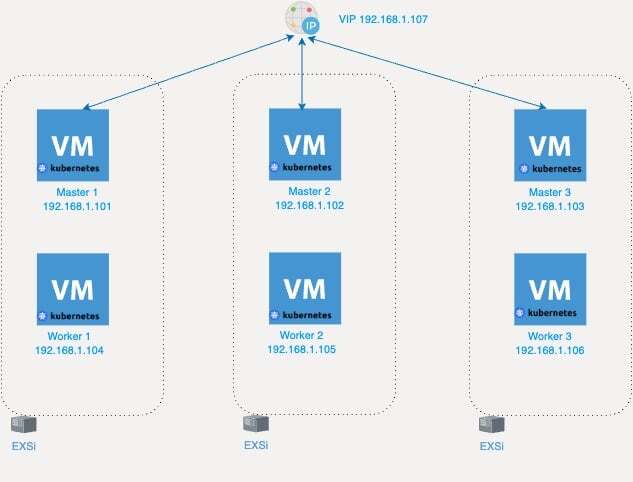
This guide provides step-by-step instructions for setting up a high-availability Kubernetes cluster with version 1.11, using 3 master nodes and 3 worker nodes. We will using Keepalived to manage a virual/floating IP as loadbalancer.
(In my case i’m using VMware ESXi to spin up and host the VMs)
Prerequisites
- CentOS 7 installed on all nodes (without a swap partition).
- SSH access to all nodes with root access.
Node Information
Master Nodes:
- master-01: 192.168.1.101
- master-02: 192.168.1.102
- master-03: 192.168.1.103
Worker Nodes:
- worker-01: 192.168.1.104
- worker-02: 192.168.1.105
- worker-03: 192.168.1.106
Keepalived Floating IP:
- 192.168.1.107
1. Initial Setup
Disable Firewalld and Swap
Execute these commands on all nodes to disable firewalld and swap:
1
2
3
4
5
systemctl stop firewalld
systemctl disable firewalld
swapoff -a
sed -i '/ swap / s/^\\(.*\\)$/#\\1/g' /etc/fstab
Set SELinux in Permissive (/Disabled) Mode
Run the following on all nodes to set SELinux in a permissive mode:
1
2
3
setenforce 0
sed -i 's/^SELINUX=enforcing$/SELINUX=permissive/' /etc/selinux/config
2. Docker Installation
Install Docker version 17.03 on all nodes, which is compatible with Kubernetes 1.11:
1
2
3
yum-config-manager --add-repo <https://download.docker.com/linux/centos/docker-ce.repo>
yum install -y --setopt=obsoletes=0 docker-ce-17.03.2.ce-1.el7.centos docker-ce-selinux-17.03.2.ce-1.el7.centos
systemctl enable docker && systemctl start docker
3. Kubernetes Setup
Add Kubernetes Yum Repository
On all nodes, configure the Kubernetes yum Repo:
1
2
3
4
5
6
7
8
9
10
cat <<EOF > /etc/yum.repos.d/kubernetes.repo
[kubernetes]
name=Kubernetes
baseurl=https://packages.cloud.google.com/yum/repos/kubernetes-el7-x86_64
enabled=1
gpgcheck=1
repo_gpgcheck=1
gpgkey=https://packages.cloud.google.com/yum/doc/yum-key.gpg <https://packages.cloud.google.com/yum/doc/rpm-package-key.gpg>
exclude=kube*
EOF
Install Kubernetes Components
Install kubeadm, kubectl, and kubelet:
1
2
yum install kubeadm-1.11.3 kubectl-1.11.3 kubelet-1.11.3 --disableexcludes=kubernetes
systemctl enable kubelet && systemctl start kubelet
4. Configure the Kubernetes Cluster
Master Nodes Configuration
Set up the Load Balancer (with keepalive)
Assuming a keepalived setup for the virtual/floating IP (VIP), configure keepalived on all master nodes. Use the floating IP 192.168.1.107 and adjust the priorities to designate the primary and backup master nodes. Example keepalived.conf for master-01 (as the primary):
1
2
3
4
5
6
7
8
9
10
11
12
13
14
15
16
17
18
19
20
21
22
23
24
25
26
27
! Configuration File for keepalived
global_defs {
  router_id LVS_DEVEL
}
vrrp_script check_apiserver {
  script "/etc/keepalived/check_apiserver.sh"
  interval 3
  weight -2
  fall 10
  rise 2
}
vrrp_instance VI_1 {
 state MASTER
 interface ens160
 virtual_router_id 51
 priority 101
 authentication {
    auth_type PASS
    auth_pass 5be37dc3b4c90194d1600c483e10ad5d
 }
 virtual_ipaddress {
    192.168.1.107
 }
 track_script {
    check_apiserver
 }
}
Repeat for other master nodes, setting state to BACKUP and adjusting priority.
Initialize the Cluster on Master-01
1
kubeadm init --config=kubeadm-config.yaml
Note: write down the generated token, we will need to use it later to join the other nodes.
Where kubeadm-config.yaml is adjusted to your cluster’s specs, including API server cert SANs for the floating IP and individual master IPs.
Join Worker and Additional Master Nodes
Use the output token from kubeadm init on master-01 to join other nodes to the cluster.
1
kubeadm join --token <token> <master-01-ip>:6443 --discovery-token-ca-cert-hash sha256:<hash>
5. Post-Installation
Set up network plugins, so we’re going to Deploy a Pod Network.
1
kubectl apply -f <https://docs.projectcalico.org/v3.1/getting-started/kubernetes/installation/hosted/kubeadm-1.7/calico.yaml>
Testing the Cluster
To make sure the cluster works probably.
1
kubectl get nodes
Deploy a Test Application
We’re going to deploy a simple nginx app as test.
1
2
kubectl create deployment nginx --image=nginx
kubectl expose deployment nginx --port=80 --type=NodePort
To list the deployments and check the exposed service.
1
2
kubectl get deploy
kubectl get svc nginx
I hope this guide was helpful. Thank you for reading!