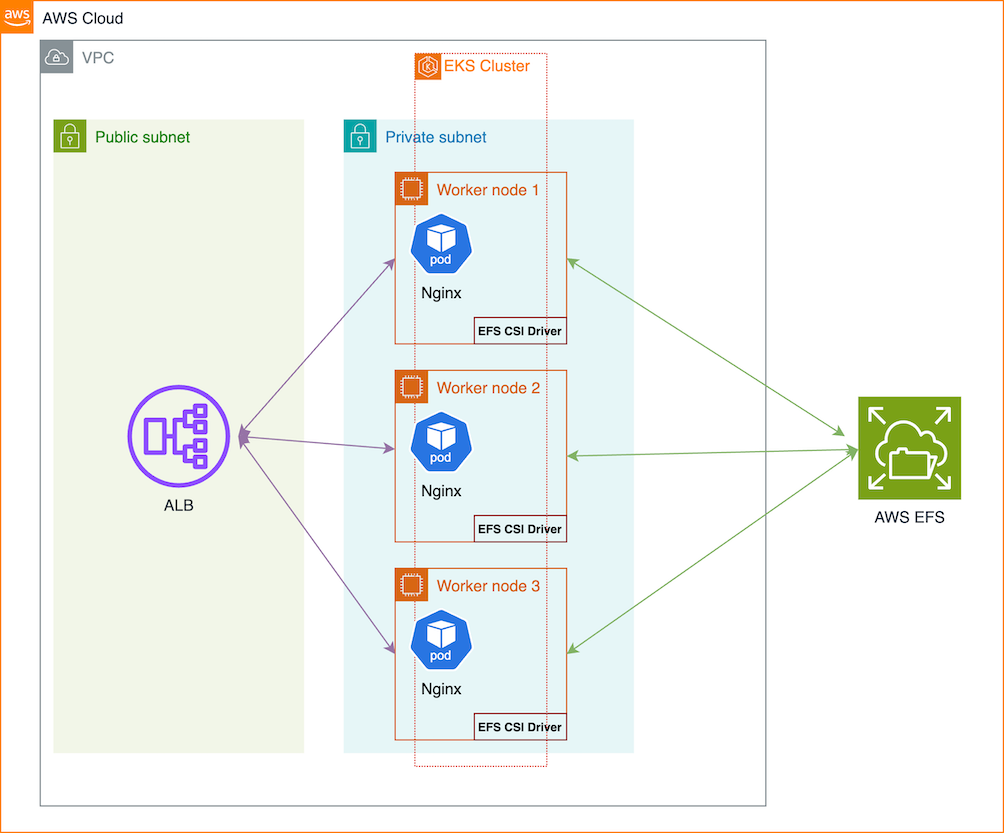
In this guide, we’ll walk through setting up an EKS cluster with dynamic EFS volume provisioning and ingress. Follow the steps below to deploy a web application using these services.
Prerequisites
Steps Overview
- Create the EKS cluster
- Set up the EFS CSI driver
- Create an EFS file system
- Deploy storage class and persistent volume claim
- Set up AWS Load Balancer Controller
- Deploy the web application and configure ingress
Step 1: Create the EKS Cluster
Set the necessary environment variables:
1
2
3
4
5
6
7
8
| export EKS_CLUSTER_NAME=mo-lab
export AWS_REGION=us-east-1
export ACCOUNT_ID= ##PASTE_YOUR_ACCOUNT_ID_HERE##
export K8S_VERSION="1.21" ##SET_YOUR_DESIRED_VERSION
##If you'd prefer to pass Access & secret keys instead of aws config
export AWS_ACCESS_KEY_ID="YourAccesskey"
export AWS_SECRET_ACCESS_KEY="YourSecretkey"
|
Create the cluster.yaml file:
1
2
3
4
5
6
7
8
9
10
11
12
13
14
15
16
17
18
19
20
21
22
23
24
25
26
27
28
29
30
31
32
| apiVersion: eksctl.io/v1alpha5
kind: ClusterConfig
metadata:
name: ${EKS_CLUSTER_NAME}
region: ${AWS_REGION}
version: "${K8S_VERSION}"
availabilityZones:
- ${AWS_REGION}a
- ${AWS_REGION}b
- ${AWS_REGION}c
iam:
withOIDC: true
vpc:
cidr: 10.42.0.0/16
clusterEndpoints:
privateAccess: true
publicAccess: true
addons:
- name: vpc-cni
configurationValues: '{"env":{"ENABLE_PREFIX_DELEGATION":"true", "ENABLE_POD_ENI":"true", "POD_SECURITY_GROUP_ENFORCING_MODE":"standard"},"enableNetworkPolicy": "true"}'
resolveConflicts: overwrite
managedNodeGroups:
- name: default
desiredCapacity: 3
minSize: 3
maxSize: 6
instanceType: m5.large
privateNetworking: true
updateConfig:
maxUnavailablePercentage: 50
labels:
Mo-DevOps: "yes"
|
Create the cluster:
1
| envsubst < cluster.yaml | eksctl create cluster -f -
|
Step 2: Set Up the EFS CSI Driver
Create IAM Service Account for EFS CSI Driver
1
2
3
4
5
6
7
8
| eksctl create iamserviceaccount \
--name efs-csi-controller-sa \
--namespace kube-system \
--cluster ${EKS_CLUSTER_NAME} \
--role-name AmazonEKS_EFS_CSI_DriverRole \
--role-only \
--attach-policy-arn arn:aws:iam::aws:policy/service-role/AmazonEFSCSIDriverPolicy \
--approve
|
Update Trust Policy
1
2
3
4
| TRUST_POLICY=$(aws iam get-role --role-name AmazonEKS_EFS_CSI_DriverRole --query 'Role.AssumeRolePolicyDocument' | \
sed -e 's/efs-csi-controller-sa/efs-csi-*/' -e 's/StringEquals/StringLike/')
aws iam update-assume-role-policy --role-name AmazonEKS_EFS_CSI_DriverRole --policy-document "$TRUST_POLICY"
|
Create EFS CSI Driver Addon
1
2
3
4
| aws eks create-addon --cluster-name $EKS_CLUSTER_NAME --addon-name aws-efs-csi-driver \
--service-account-role-arn arn:aws:iam::${ACCOUNT_ID}:role/AmazonEKS_EFS_CSI_DriverRole
aws eks wait addon-active --cluster-name $EKS_CLUSTER_NAME --addon-name aws-efs-csi-driver
|
Verify EFS CSI Driver Installation
1
| kubectl get daemonset efs-csi-node -n kube-system
|
Step 3: Create an EFS File System
Create EFS File System
1
2
3
4
5
| aws efs create-file-system --creation-token ${EKS_CLUSTER_NAME}-efs
export EFS_ID=$(aws efs describe-file-systems --query "FileSystems[?CreationToken=='${EKS_CLUSTER_NAME}-efs'].FileSystemId | [0]" --output text)
echo $EFS_ID
|
1
2
3
4
5
6
7
8
9
10
| VPC_ID=$(aws eks describe-cluster --name ${EKS_CLUSTER_NAME} --query "cluster.resourcesVpcConfig.vpcId" --output text)
SUBNET_IDS=$(aws ec2 describe-subnets --filters Name=vpc-id,Values=${VPC_ID} --query "Subnets[*].SubnetId" --output text)
PRIVATE_SUBNET_IDS=$(aws ec2 describe-subnets --filters "Name=vpc-id,Values=${VPC_ID}" "Name=tag:kubernetes.io/role/internal-elb,Values=1" --query "Subnets[*].SubnetId" --output text)
#To verify
echo $VPC_ID
echo $SUBNET_IDS
echo $PRIVATE_SUBNET_IDS
|
Create Security Group and Authorize Ingress
1
2
3
4
5
| SECURITY_GROUP_ID=$(aws ec2 create-security-group --group-name efs-sg --description "EFS security group" --vpc-id ${VPC_ID} --query "GroupId" --output text)
echo $SECURITY_GROUP_ID
aws ec2 authorize-security-group-ingress --group-id ${SECURITY_GROUP_ID} --protocol tcp --port 2049 --cidr 0.0.0.0/0
|
Create EFS Mount Targets
1
2
3
4
| echo $PRIVATE_SUBNET_IDS
#PASS EACH SUBNET_ID
aws efs create-mount-target --file-system-id ${EFS_ID} --subnet-id ##SET_SUBNET_ID## --security-groups ${SECURITY_GROUP_ID}
|
Step 4: Deploy Storage Class and Persistent Volume Claim
Create Storage Class ( storageClass.yaml )
1
2
3
4
5
6
7
8
9
10
| apiVersion: storage.k8s.io/v1
kind: StorageClass
metadata:
name: efs-sc
provisioner: efs.csi.aws.com
parameters:
fileSystemId: $EFS_ID #or set the ID manully
directoryPerms: "700"
basePath: "/"
provisioningMode: efs-ap
|
Create Persistent Volume Claim ( pvc.yaml )
1
2
3
4
5
6
7
8
9
10
11
12
| apiVersion: v1
kind: PersistentVolumeClaim
metadata:
name: efs-pvc
namespace: mo-lab
spec:
accessModes:
- ReadWriteMany
storageClassName: efs-sc
resources:
requests:
storage: 5Gi
|
1
2
3
| kubectl create namespace mo-lab #set your own namespace
kubectl create -f storageClass.yaml
kubectl create -f pvc.yaml
|
Step 5: Set Up AWS Load Balancer Controller
Install IAM Policy
1
2
3
4
5
| curl -O https://raw.githubusercontent.com/kubernetes-sigs/aws-load-balancer-controller/v2.7.2/docs/install/iam_policy.json
aws iam create-policy \
--policy-name AWSLoadBalancerControllerIAMPolicy \
--policy-document file://iam_policy.json
|
Create IAM Service Account
1
2
3
4
5
6
7
| eksctl create iamserviceaccount \
--cluster=${EKS_CLUSTER_NAME} \
--namespace=kube-system \
--name=aws-load-balancer-controller \
--role-name AmazonEKSLoadBalancerControllerRole \
--attach-policy-arn=arn:aws:iam::${ACCOUNT_ID}:policy/AWSLoadBalancerControllerIAMPolicy \
--approve
|
Install AWS Load Balancer Controller with Helm
1
2
3
4
5
| helm install aws-load-balancer-controller eks/aws-load-balancer-controller \
-n kube-system \
--set clusterName=${EKS_CLUSTER_NAME} \
--set serviceAccount.create=false \
--set serviceAccount.name=aws-load-balancer-controller
|
Deploy Nginx Web Application (deployment.yaml )
1
2
3
4
5
6
7
8
9
10
11
12
13
14
15
16
17
18
19
20
21
22
23
24
25
26
27
| apiVersion: apps/v1
kind: Deployment
metadata:
name: nginx-deployment
namespace: mo-lab
spec:
replicas: 1
selector:
matchLabels:
app: nginx
template:
metadata:
labels:
app: nginx
spec:
containers:
- name: nginx
image: nginx:latest
ports:
- containerPort: 80
volumeMounts:
- name: efs-storage
mountPath: /usr/share/nginx/html
volumes:
- name: efs-storage
persistentVolumeClaim:
claimName: efs-pvc
|
Create Service for Nginx (service.yaml)
1
2
3
4
5
6
7
8
9
10
11
12
13
| apiVersion: v1
kind: Service
metadata:
name: nginx-service
namespace: mo-lab
spec:
selector:
app: nginx
ports:
- protocol: TCP
port: 80
targetPort: 80
type: NodePort
|
Create Ingress (ingress.yaml)
1
2
3
4
5
6
7
8
9
10
11
12
13
14
15
16
17
18
19
20
| apiVersion: networking.k8s.io/v1
kind: Ingress
metadata:
name: nginx-ingress
namespace: mo-lab
annotations:
alb.ingress.kubernetes.io/scheme: internet-facing
alb.ingress.kubernetes.io/target-type: ip
spec:
ingressClassName: alb
rules:
- http:
paths:
- path: /
pathType: Prefix
backend:
service:
name: nginx-service
port:
number: 80
|
1
2
3
| kubectl create -f deployment.yaml
kubectl create -f service.yaml
kubectl create -f ingress.yaml
|
Test the Application
Retrieve the ingress address:
1
| kubectl get ingress -n mo-lab
|
Open the provided address in your browser. If you encounter an error, it might be because the index.html file is missing. To fix this, create an example index.html:
1
| kubectl exec -n mo-lab nginx-deployment-<pod-number> -- bash -c "echo 'Hi, this is EKS-ingress-EFS Lab' > /usr/share/nginx/html/index.html"
|
Refresh your browser to see the deployed application.
Good luck! Thank you.